Roebling Road
Estimated from data not in trackdays.ai. The line, speeds and braking points come from cars lapping at a typical quick HPDE pace, cross-checked against published brake markers. If you have data you would like to contribute, please send it to upload@trackdays.ai to help improve our estimates.
Heads up: This is an estimate of a typical quick HPDE line, not any one car's lap. Braking points are a starting point, not a target: start a little earlier and work later in small steps. The line goes straight from throttle to brake; amber only marks where you really lift or hold part throttle. Roebling is nearly flat, so the corners are about the line, not the camber.
- Throttle
- Coast / partial
- Braking
- Apex
- T4Off-camber corner
Arrows show the direction of the lap. The grey basemap is USGS LiDAR: dark = asphalt, light = grass. Tap any map for the full-size image. 9 corner maps · updated 2026-10-23.
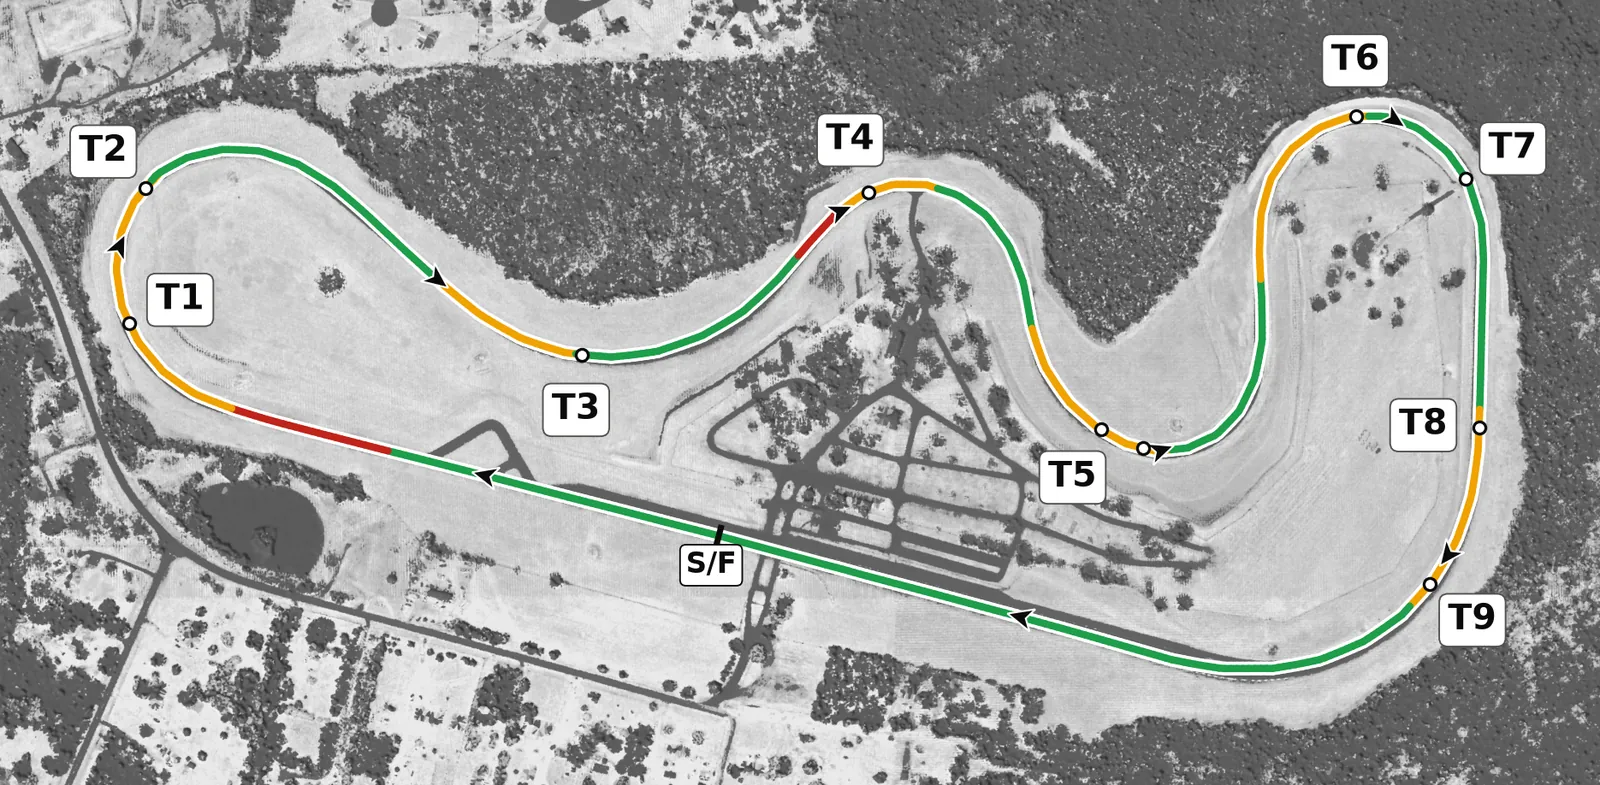
Roebling is a fast, nearly flat track of sweepers where momentum and smooth hands matter far more than braking skill; T4, T5 and T6 are the slow corners, all at about the same speed, and almost everything else is taken at high speed. With very little banking or elevation to help, the tires are all you have, so be patient on entry, favour late apexes and get on the throttle early and smoothly. The one wall on the circuit is at the exit of T9 onto the front straight, so treat that corner with the most respect.
Sim Laps
Sim laps never count here. They are simulator times, so they stay in Sim Laps.
Sectors
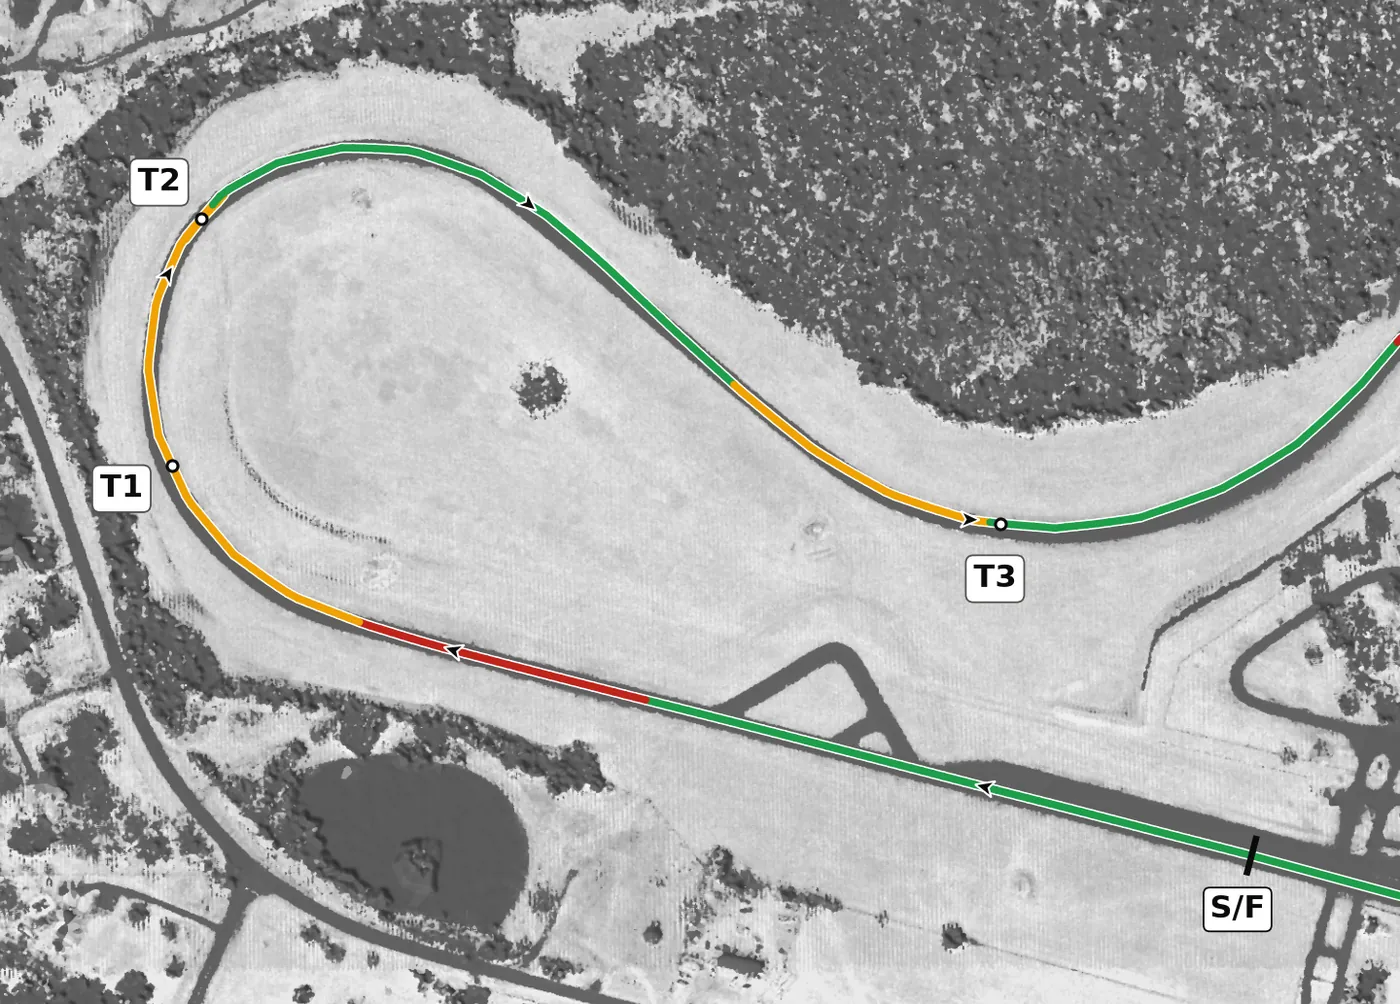
After the long front straight, T1 is a very fast, tightening right that runs straight into T2, so brake firmly, release smoothly and drive the pair as one long right. Take a late apex at T2 and get on the throttle early, because the exit feeds the run to T3.
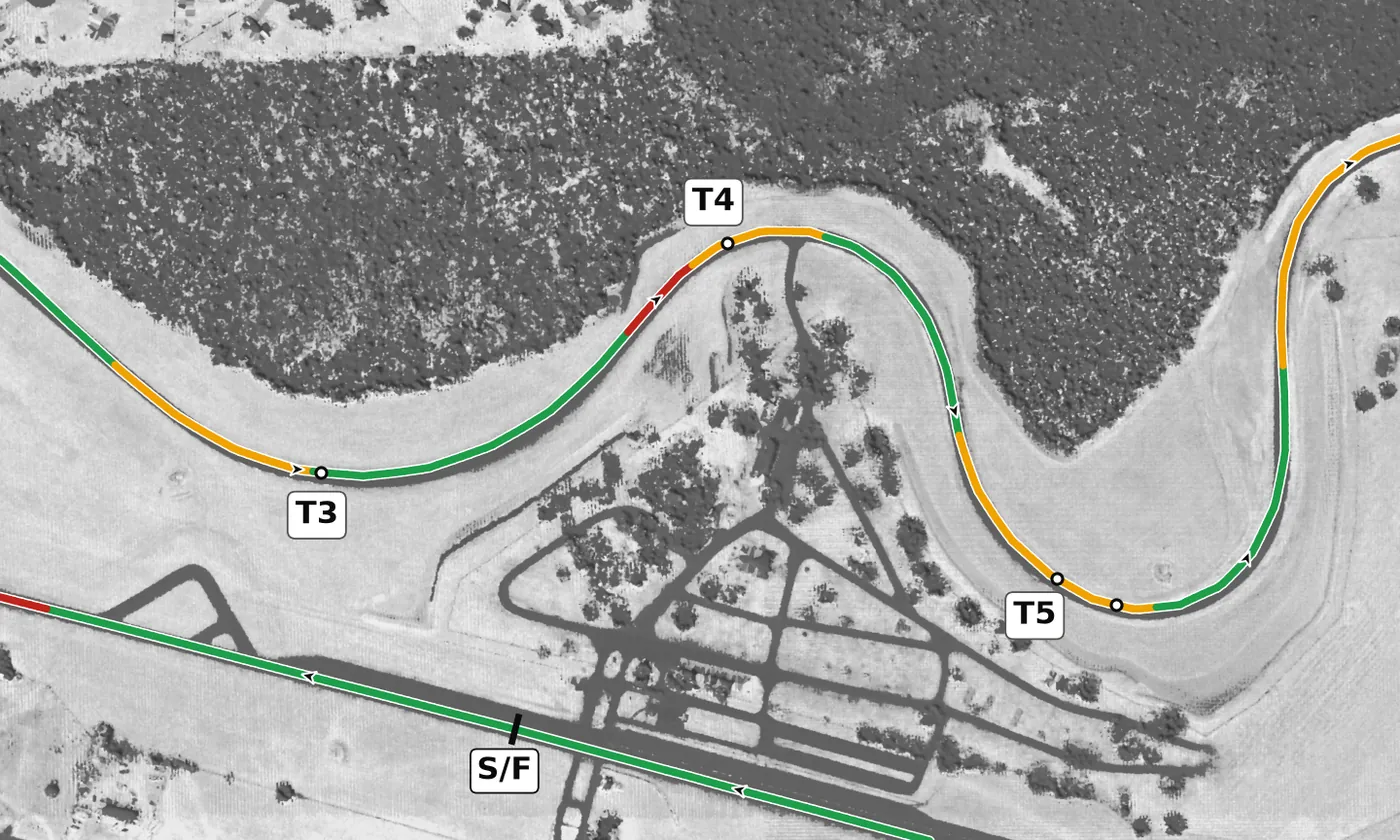
T3 is a fast left sweeper that is all about vision and smooth hands, followed by the hard brake for the tighter T4 right, where the surface is slippery and a late apex and a settled car pay off. T5 is a long left of about 165 degrees with no banking to lean on and, with T4 and T6, one of the three slowest corners on the lap, so be patient, apex late and focus on the exit.
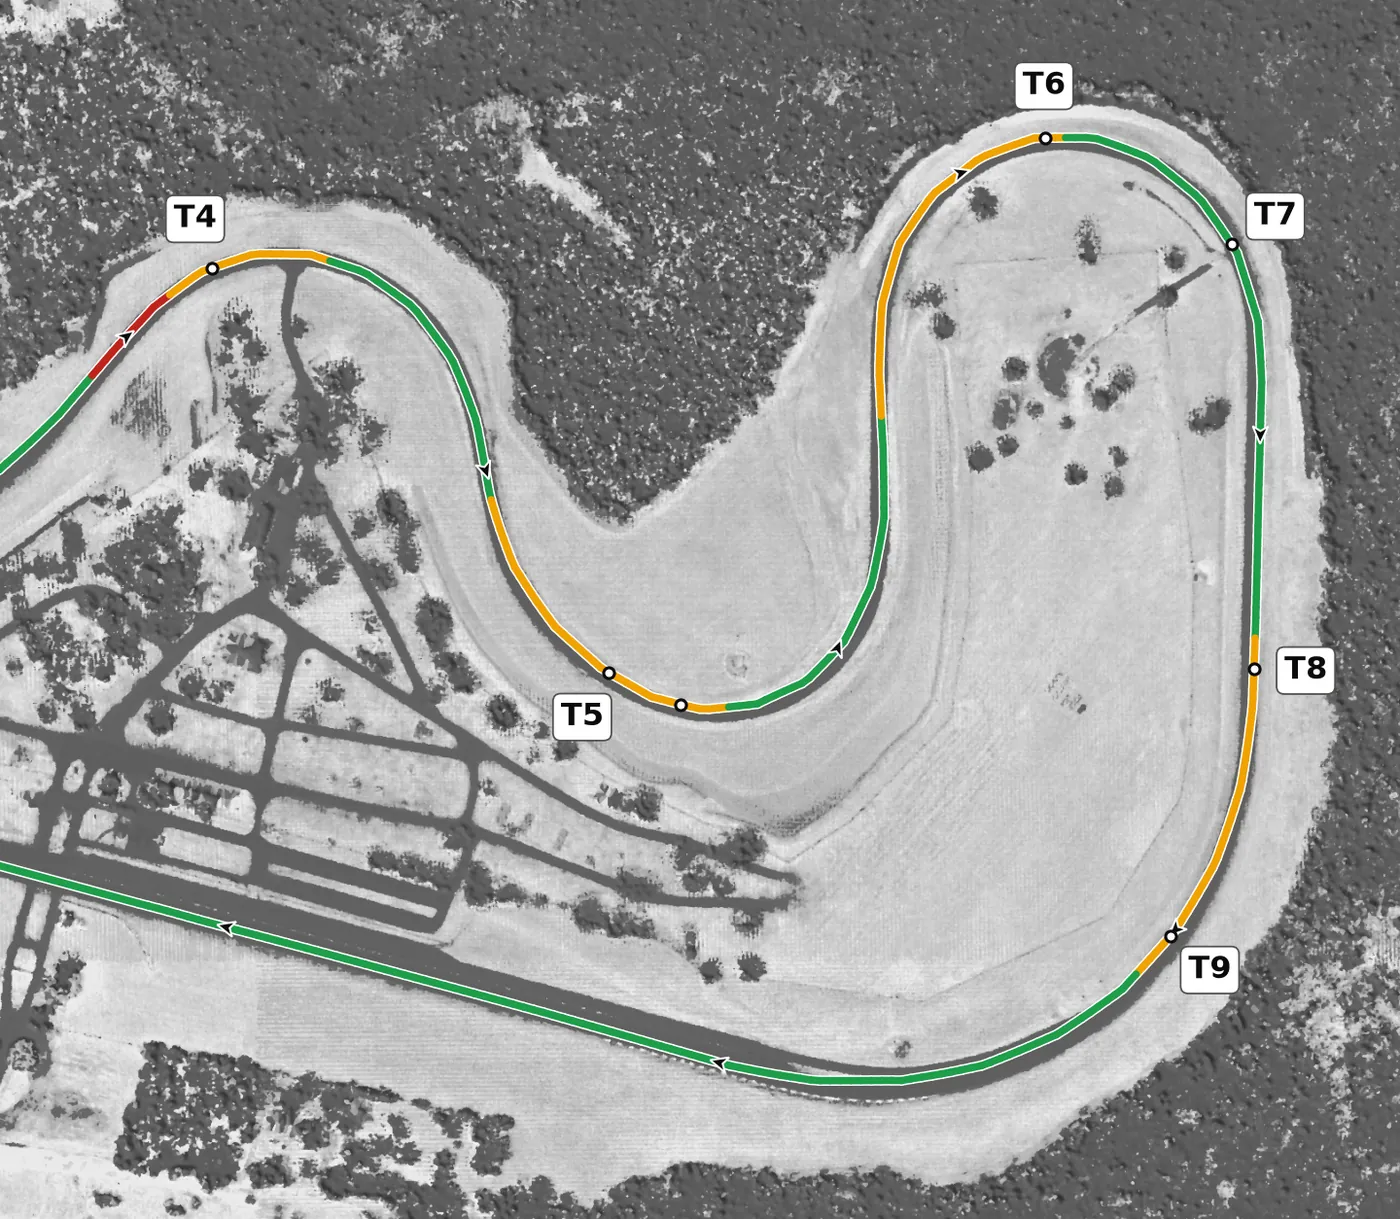
T6 and T7 are linked rights: T6 drops gently downhill on entry and T7 climbs back out from the lowest point on the track, so turn in to T6 late enough to stay on the throttle through T7. T8 and T9 are two more rights that drive as one sweep onto the front straight, and T9 has the only wall on the track at its exit, so unwind the wheel before full throttle.
Corners
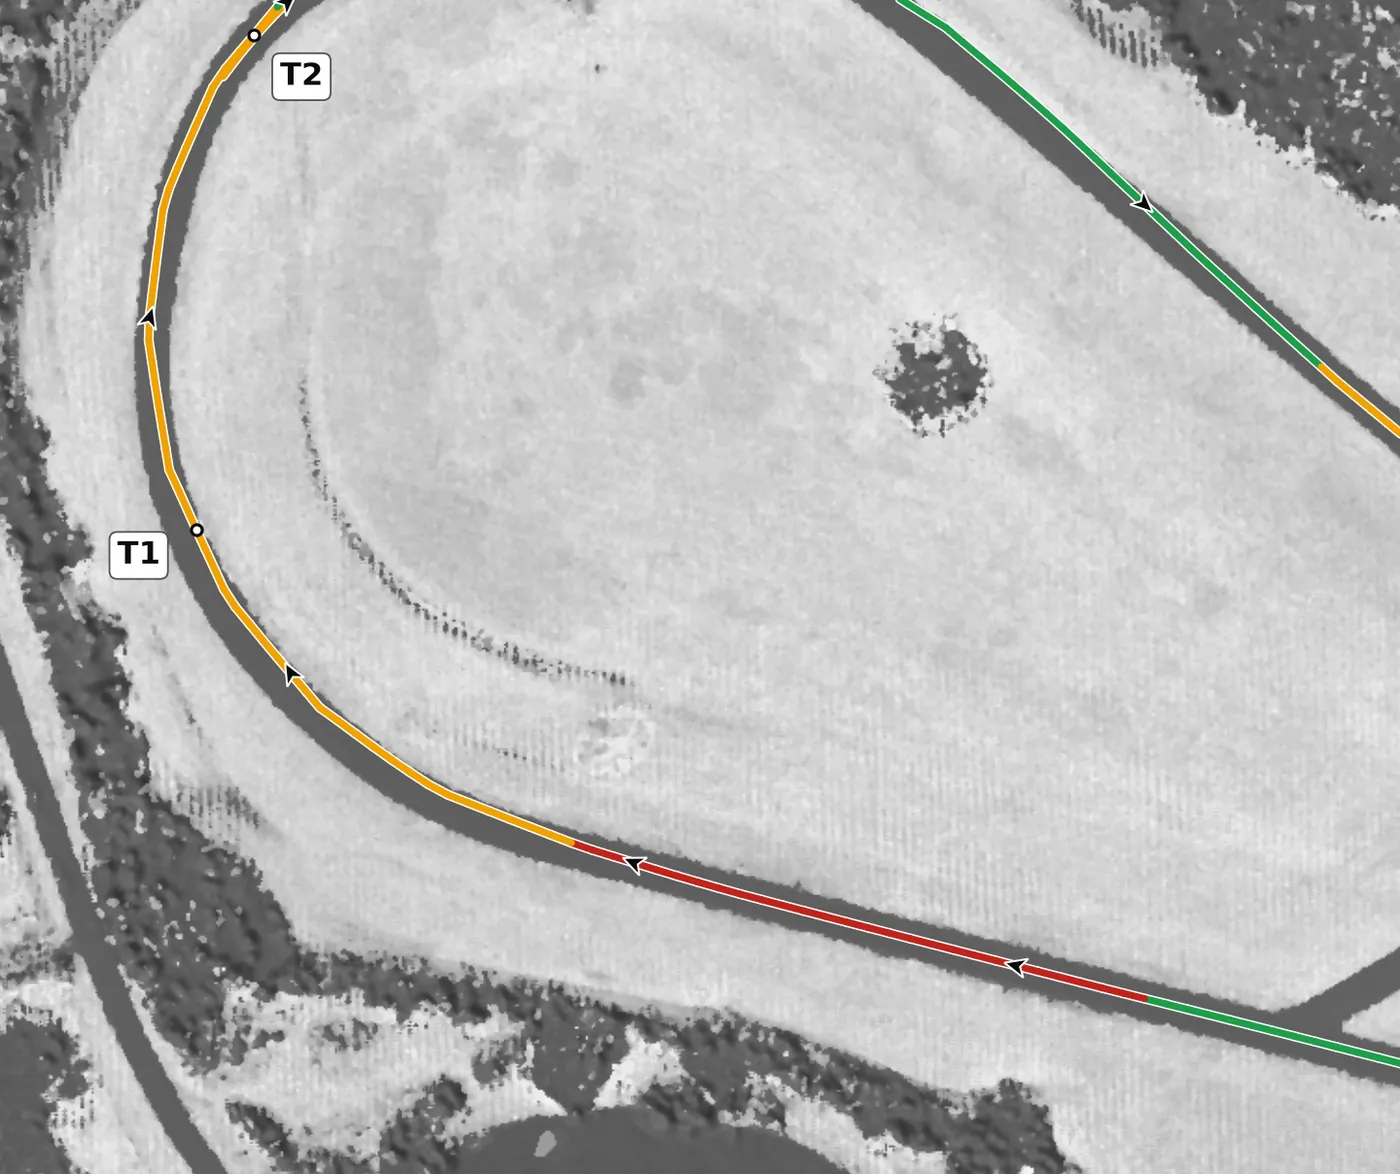
Brake firmly from the left side of the track. The green boards on the left count down in 100 ft steps from 5 to 1, beside a red-and-white kerb, and turn-in is just past the 1 board; high-power cars brake around the 4 or 5 board, lighter cars later. Release smoothly and turn into this very fast right, aiming for the end of the right-side kerb, and keep a little in reserve, because T2 follows straight away. The mistake to avoid is braking too late and arriving too fast, which forces a big lift or a slide between T1 and T2.
From the survey: T1 and T2 are one right of about 200° around the western loop. T1 is its fast entry; the slowest point comes between T1 and T2.
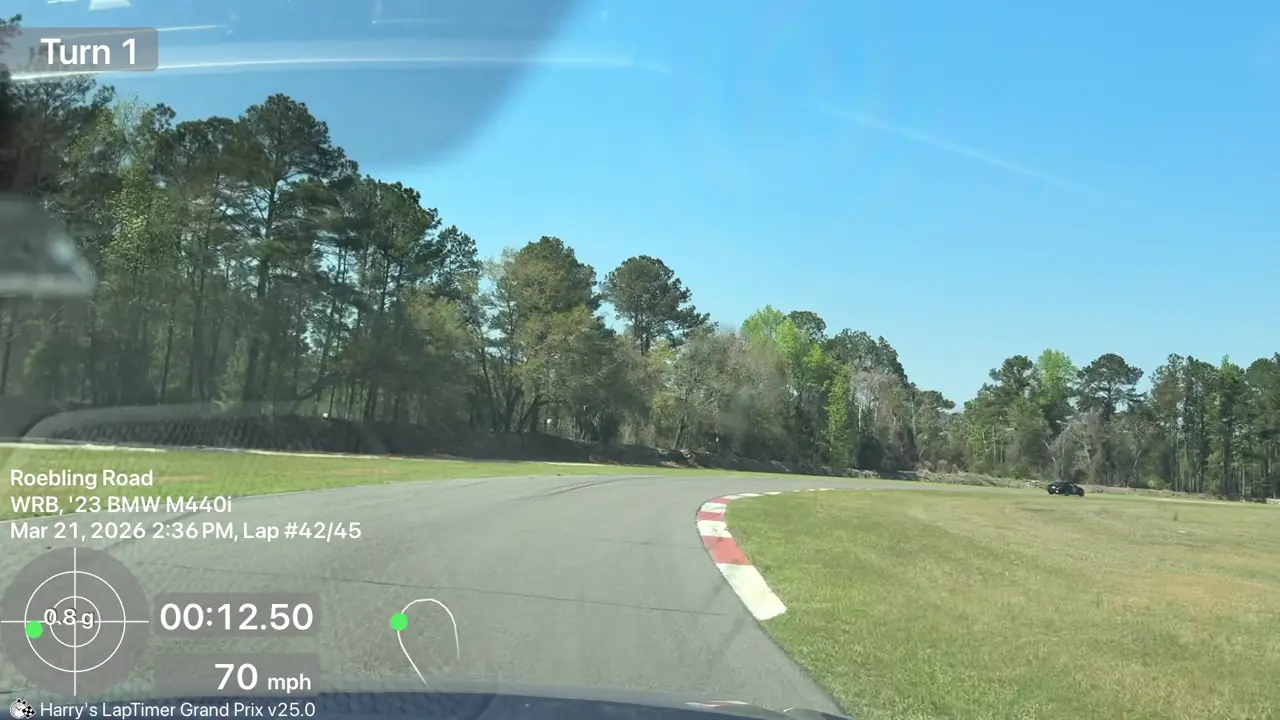
T1 apex, 70 mph. Bill's '23 M440i on his 1:26.80 best, March 2026.
- Brake: green 100 ft countdown boards, 5 to 1, on the left beside a red-and-white kerb. The M440i is on the brakes well before the 5 board; the Mach 1 brakes at the 4 board.
- Turn in just past the 1 board.
- Apex: the end of the right-side kerb.
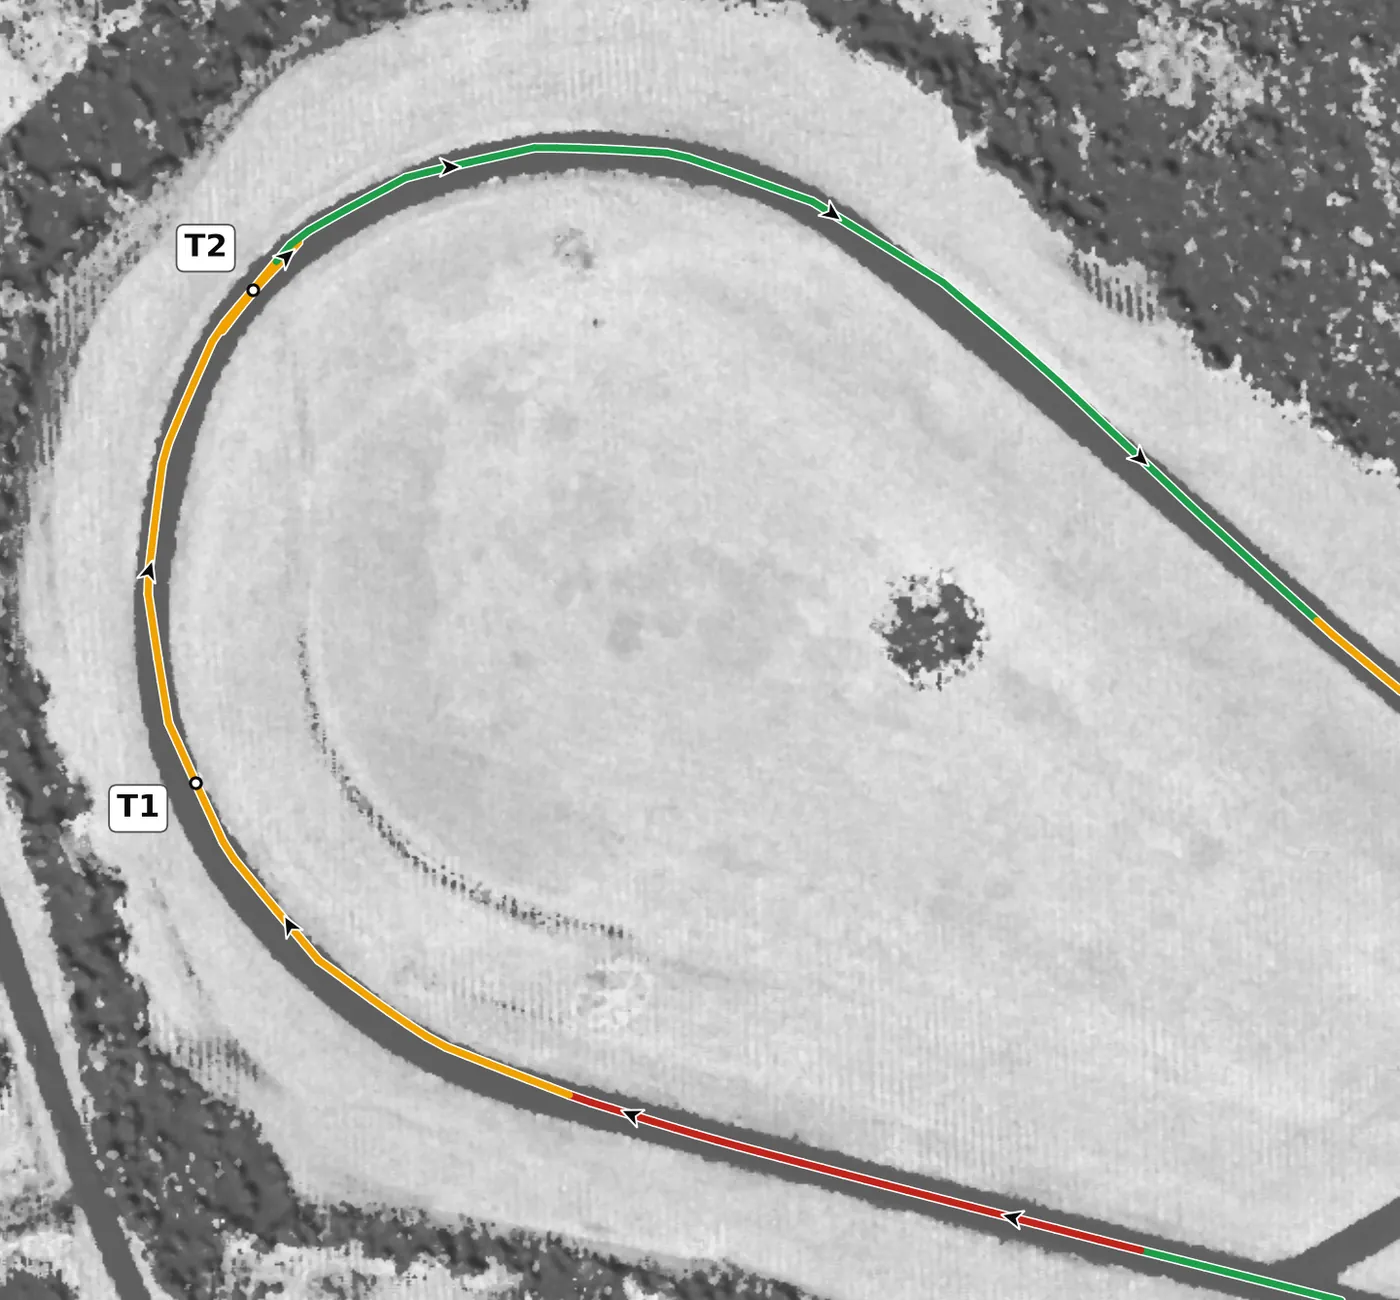
Treat T2 as the second half of one long right: brake or lift again, turn in from left of centre and wait for a late, blind apex at the end of the right-side kerb by the corner station, then get to the throttle early. It carries the most camber on the track, so the car holds a little better than it looks, but let the corner come to you. The mistake to avoid is an early apex that runs you wide on the exit.
From the survey: The most camber on the lap, and still only +2.15% at the apex.
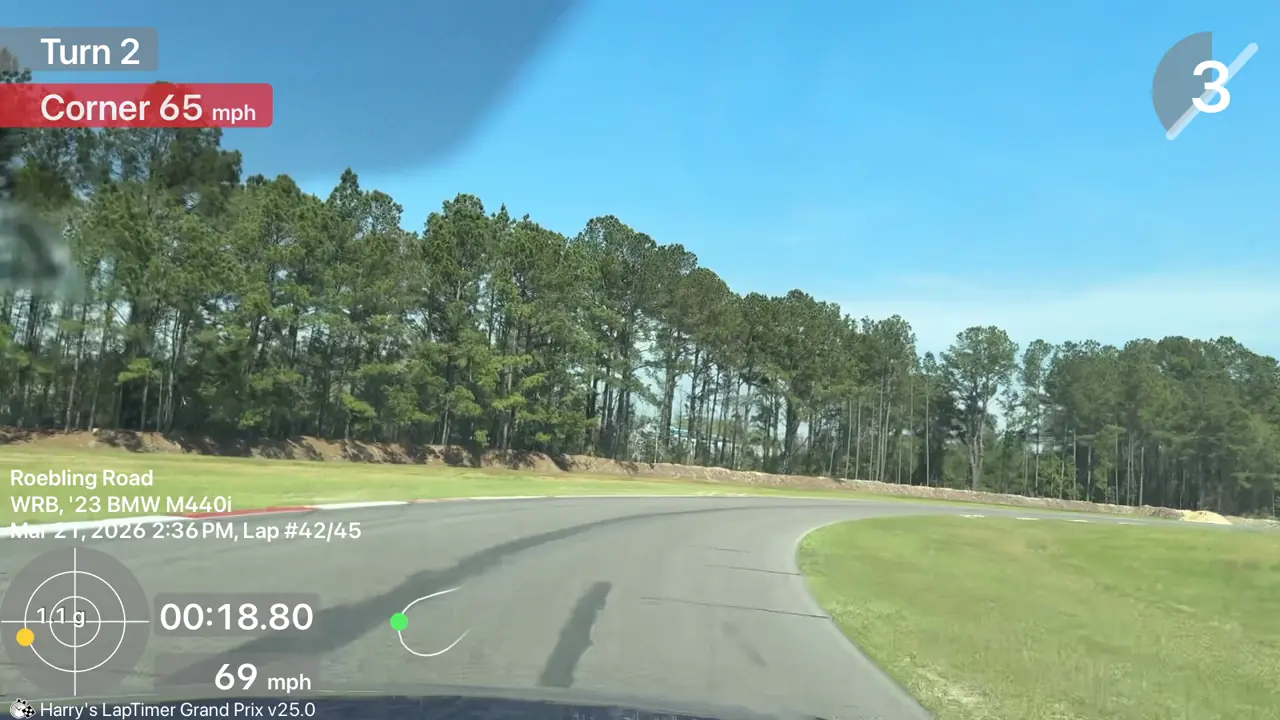
Heading for the late T2 apex, 69 mph. Bill's '23 M440i on his 1:26.80 best, March 2026.
- The slowest point of the loop comes before T2 (65 mph in the M440i): a second brake or lift.
- Apex: the end of the right-side kerb, by the corner station. It is blind, so wait for it.
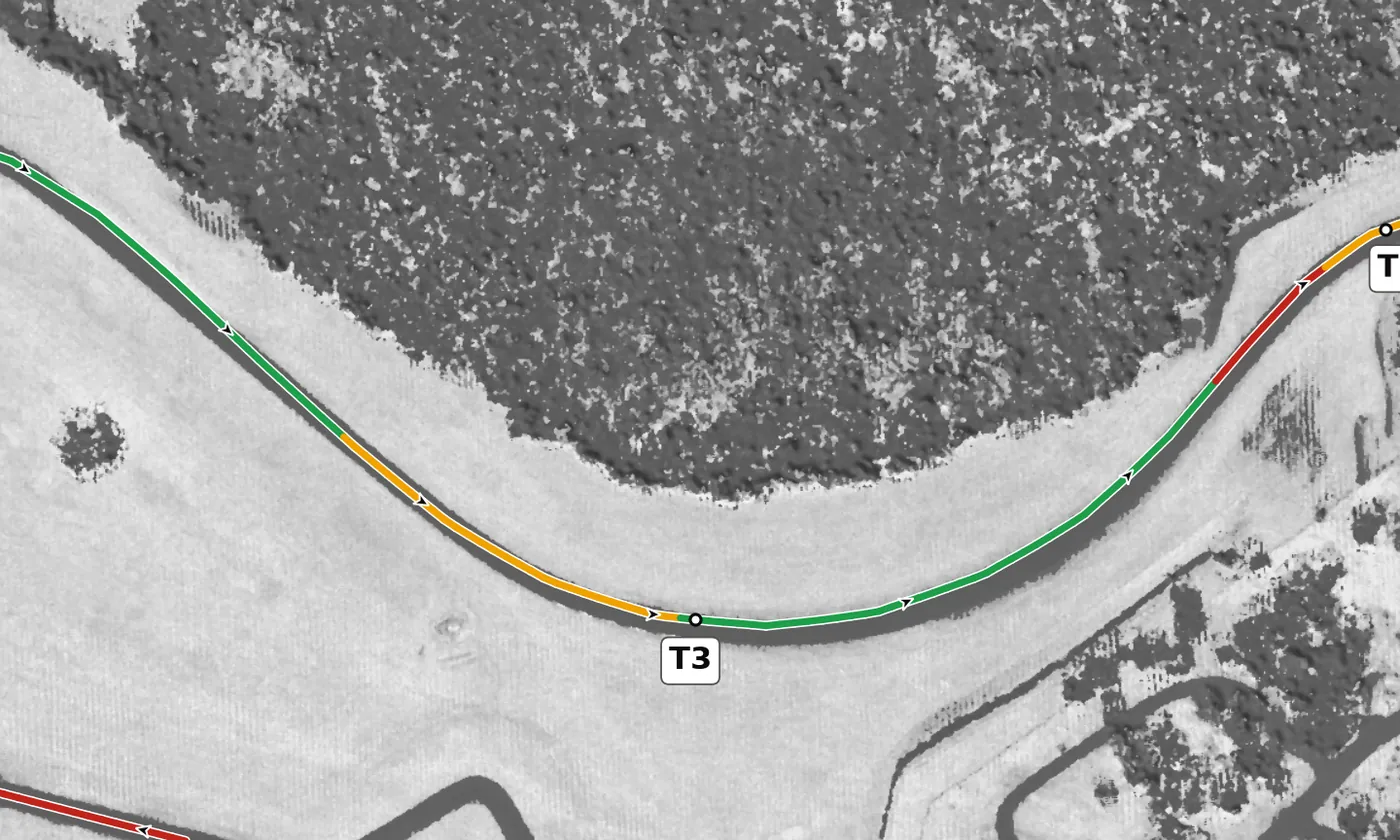
Set up on the right and turn in once you are past the corner station for this fast left sweeper, looking far ahead through the turn. Keep your hands smooth, use one steady steering input and only let the car drift halfway out, because you want to be set up for T4; a slight lift on entry is all it needs, and the car gains speed from the apex. The mistake to avoid is carrying too much speed through T3, which ruins your T4.
From the survey: A fast left with a little camber (+1.29%).
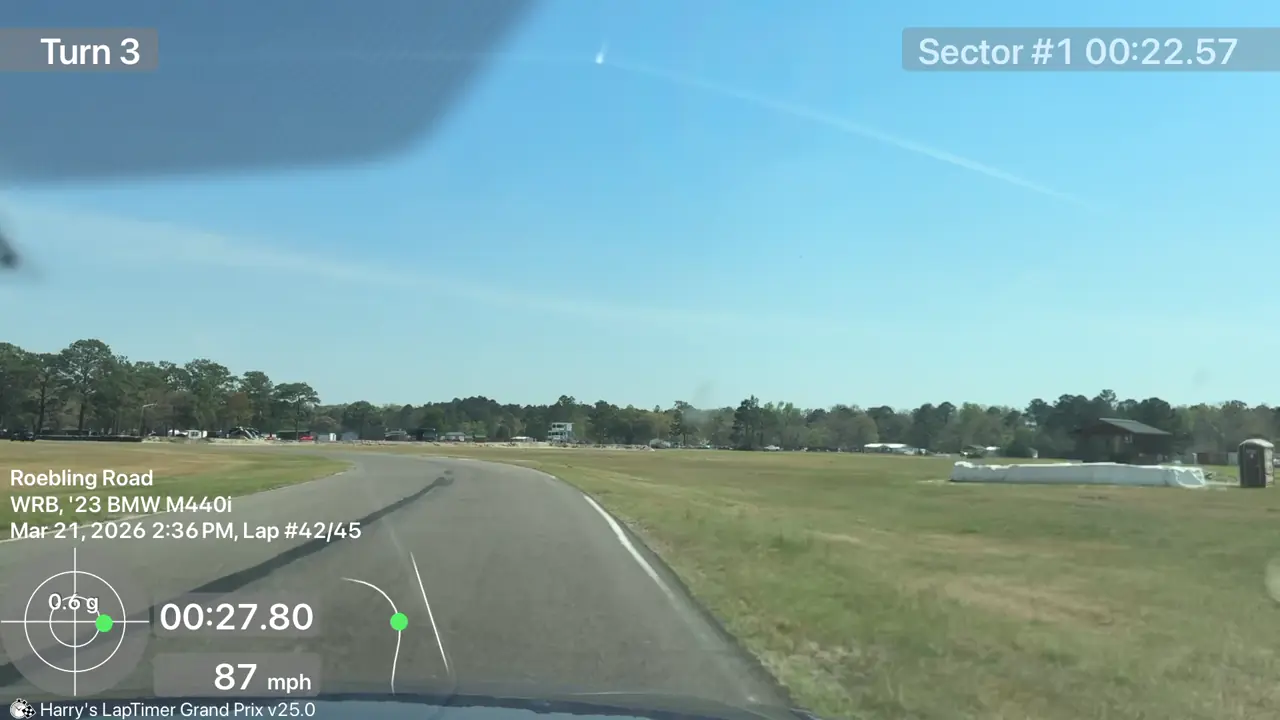
T3, 87 mph. Bill's '23 M440i on his 1:26.80 best, March 2026.
- Turn in once you pass the corner station on the right.
- A small lift on entry (94 to 87 mph in the M440i), then throttle from the apex.
- Drift only halfway out: you need the room for the T4 brake.
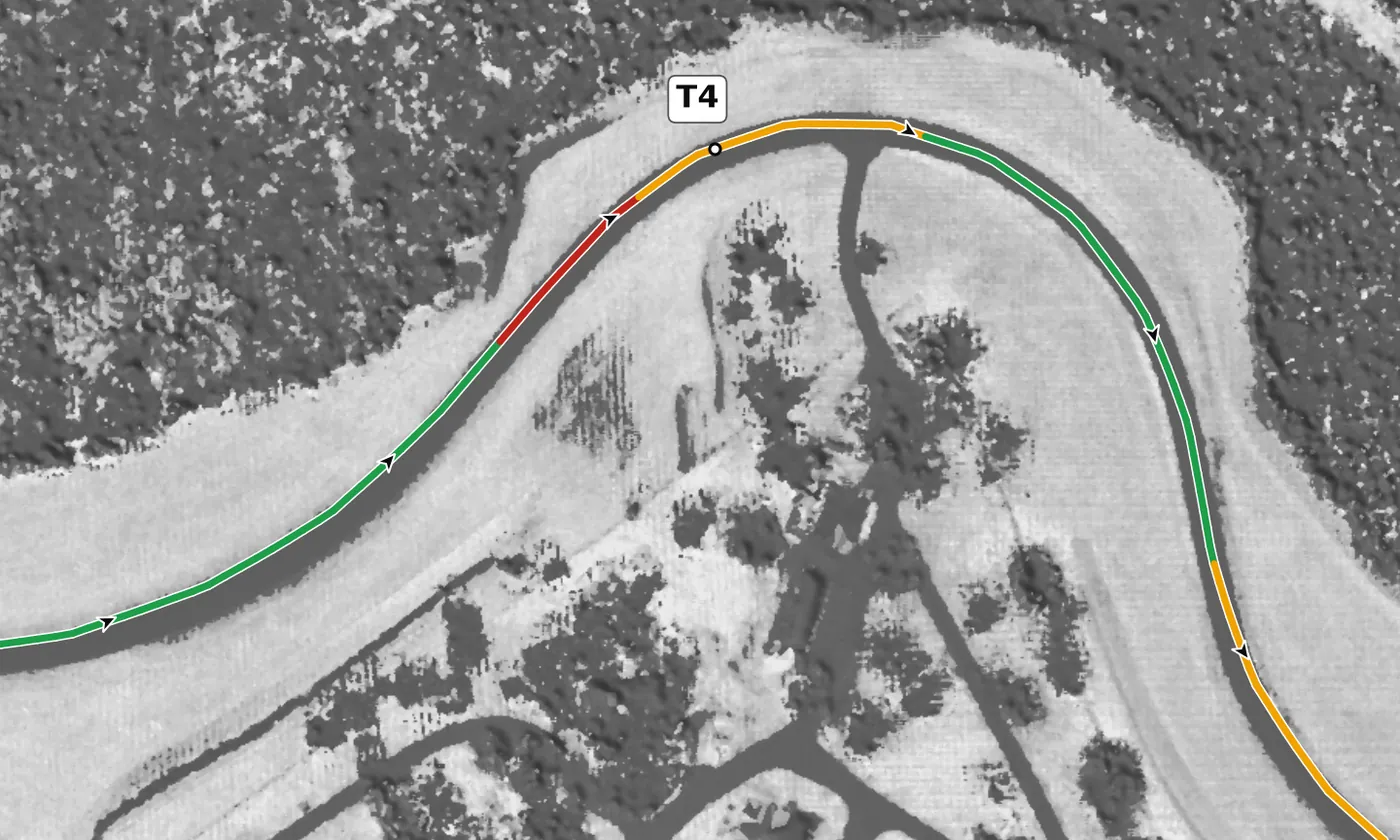
Brake hard in a straight line for this tighter right, whose surface is more slippery than the rest of the track, and worse the deeper you go into the corner. Turn in smoothly, aim for a late apex, and wait until the car is settled before adding throttle. The mistake to avoid is braking too deep and carrying too much speed in, which is how this corner earns its nickname, the Collector.
From the survey: Effectively flat (+0.24% camber): the road gives you nothing here.
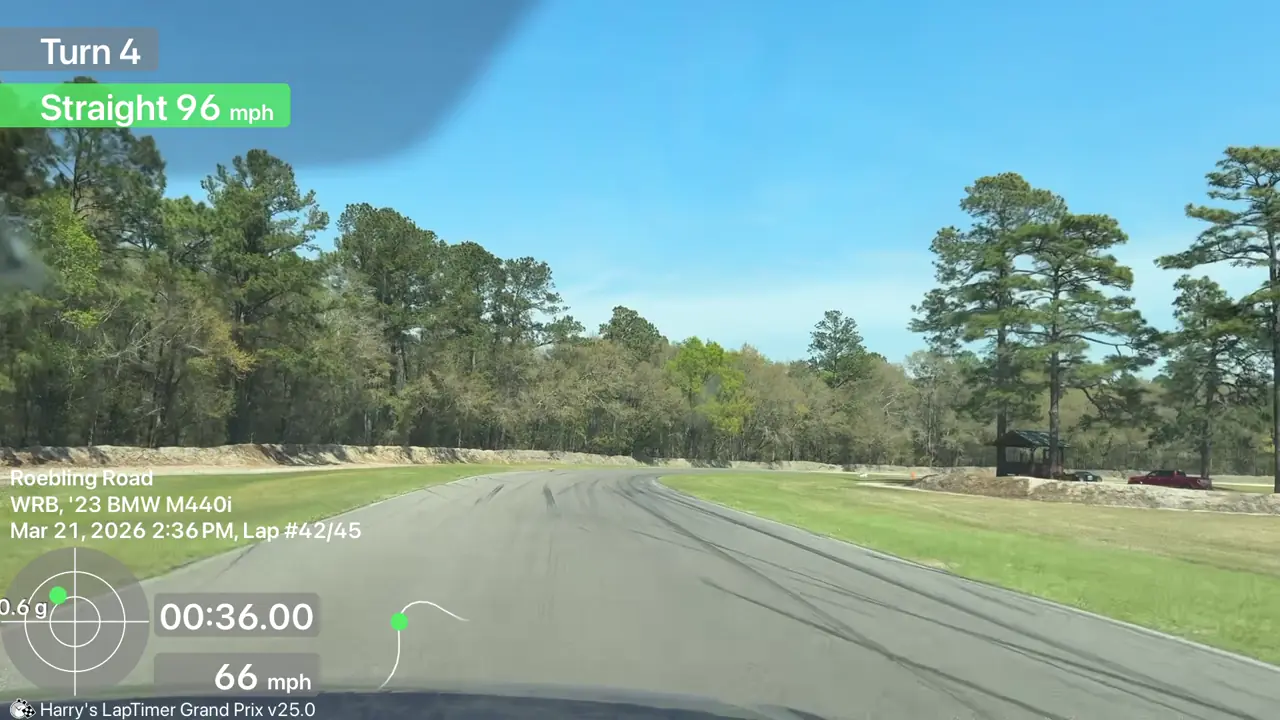
T4 turn-in, 66 mph. Bill's '23 M440i on his 1:26.80 best, March 2026.
- Brake as the red-and-white kerb on the left ends. There are no brake boards at T4, so the kerb is your marker.
- The surface is slipperier the deeper you go, so turn in early enough to reach the late apex.
- Apex: the far end of the right-side kerb.
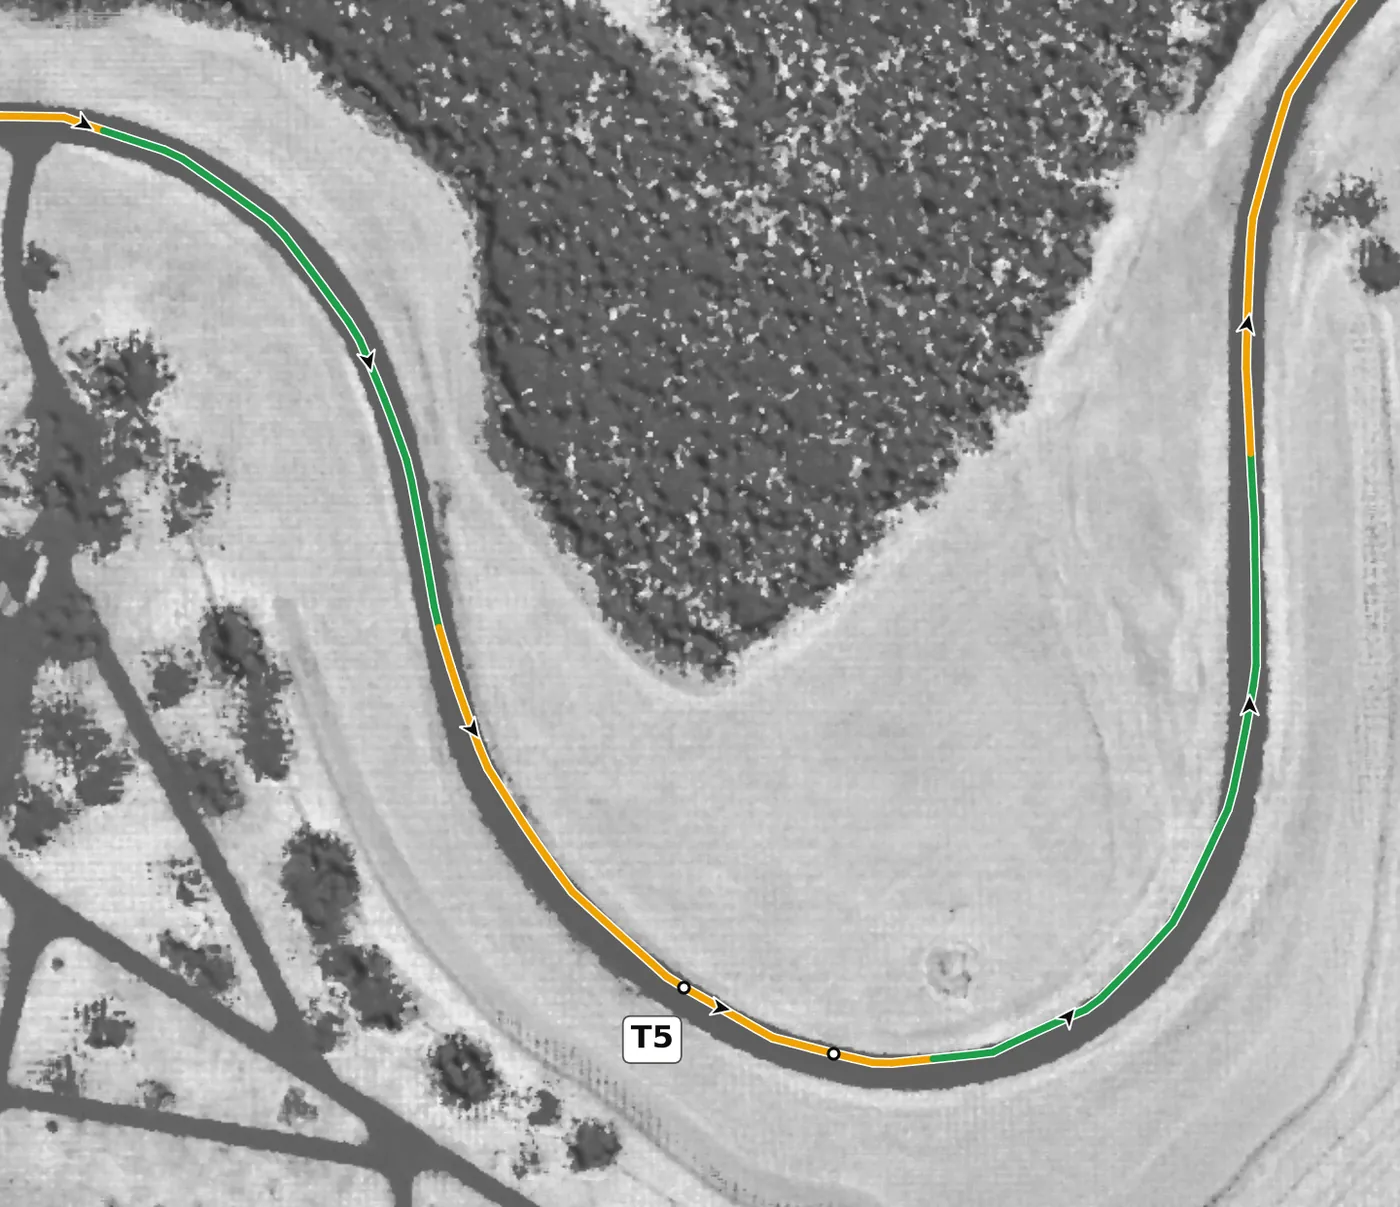
T5 is a long left of about 165 degrees with no banking to help: a shallow lead-in (5a), where you can use the left kerb, then the main turn (5b). Slow the car as you cross from 5a toward the turn-in (at HPDE pace a light brake or a firm lift), turn in late at the end of the second right-side kerb, aiming at the light pole with the metal box, and be patient through the long middle, adding throttle only when you can see the exit. The mistake to avoid is turning in early, which leaves you running out of road as the corner finishes; water can also collect here in the wet.
From the survey: One long left of about 165° in two parts (5a and 5b), flat and uncambered. T4, T5 and T6 are the slow corners, all within a few mph of each other.
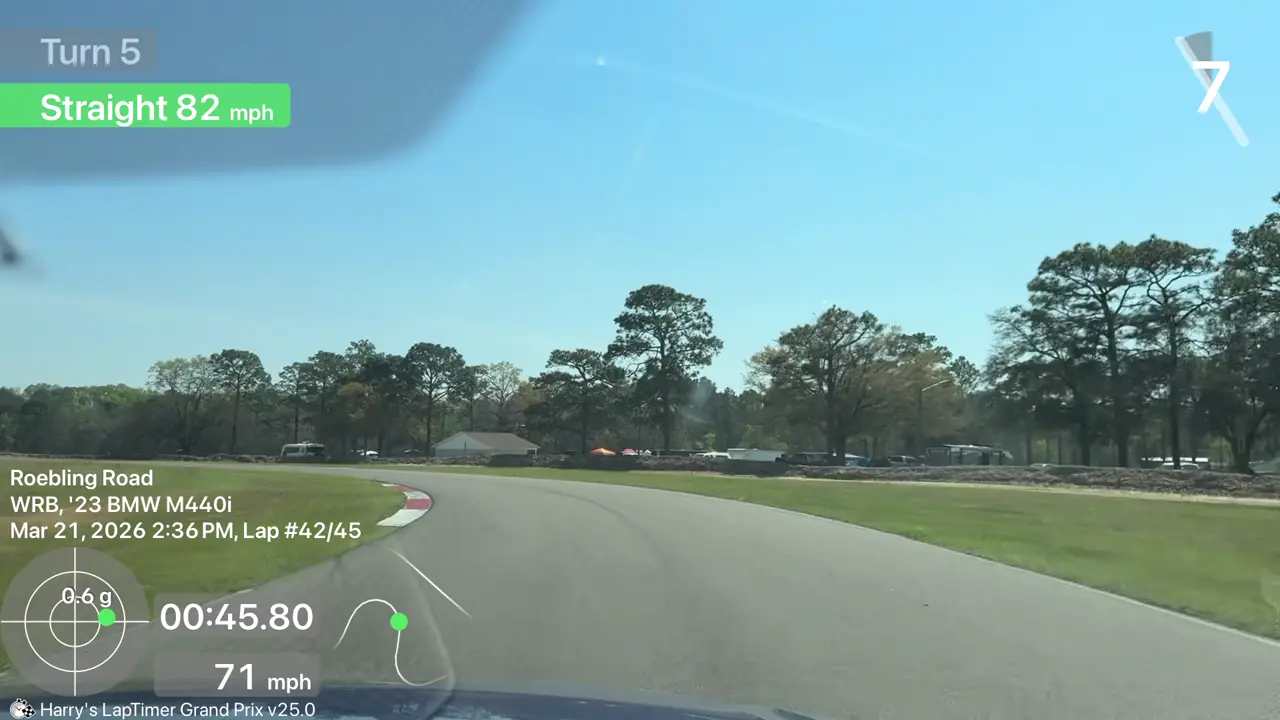
Through the 5a lead-in, 71 mph. Bill's '23 M440i on his 1:26.80 best, March 2026.
- Use the 5a kerb on the left, and slow the car as you cross toward the T5 turn-in. There are no brake boards at T5.
- Turn in at the end of the second right-side kerb, aiming at the light pole with the metal box.
- Apex late, past the corner station.
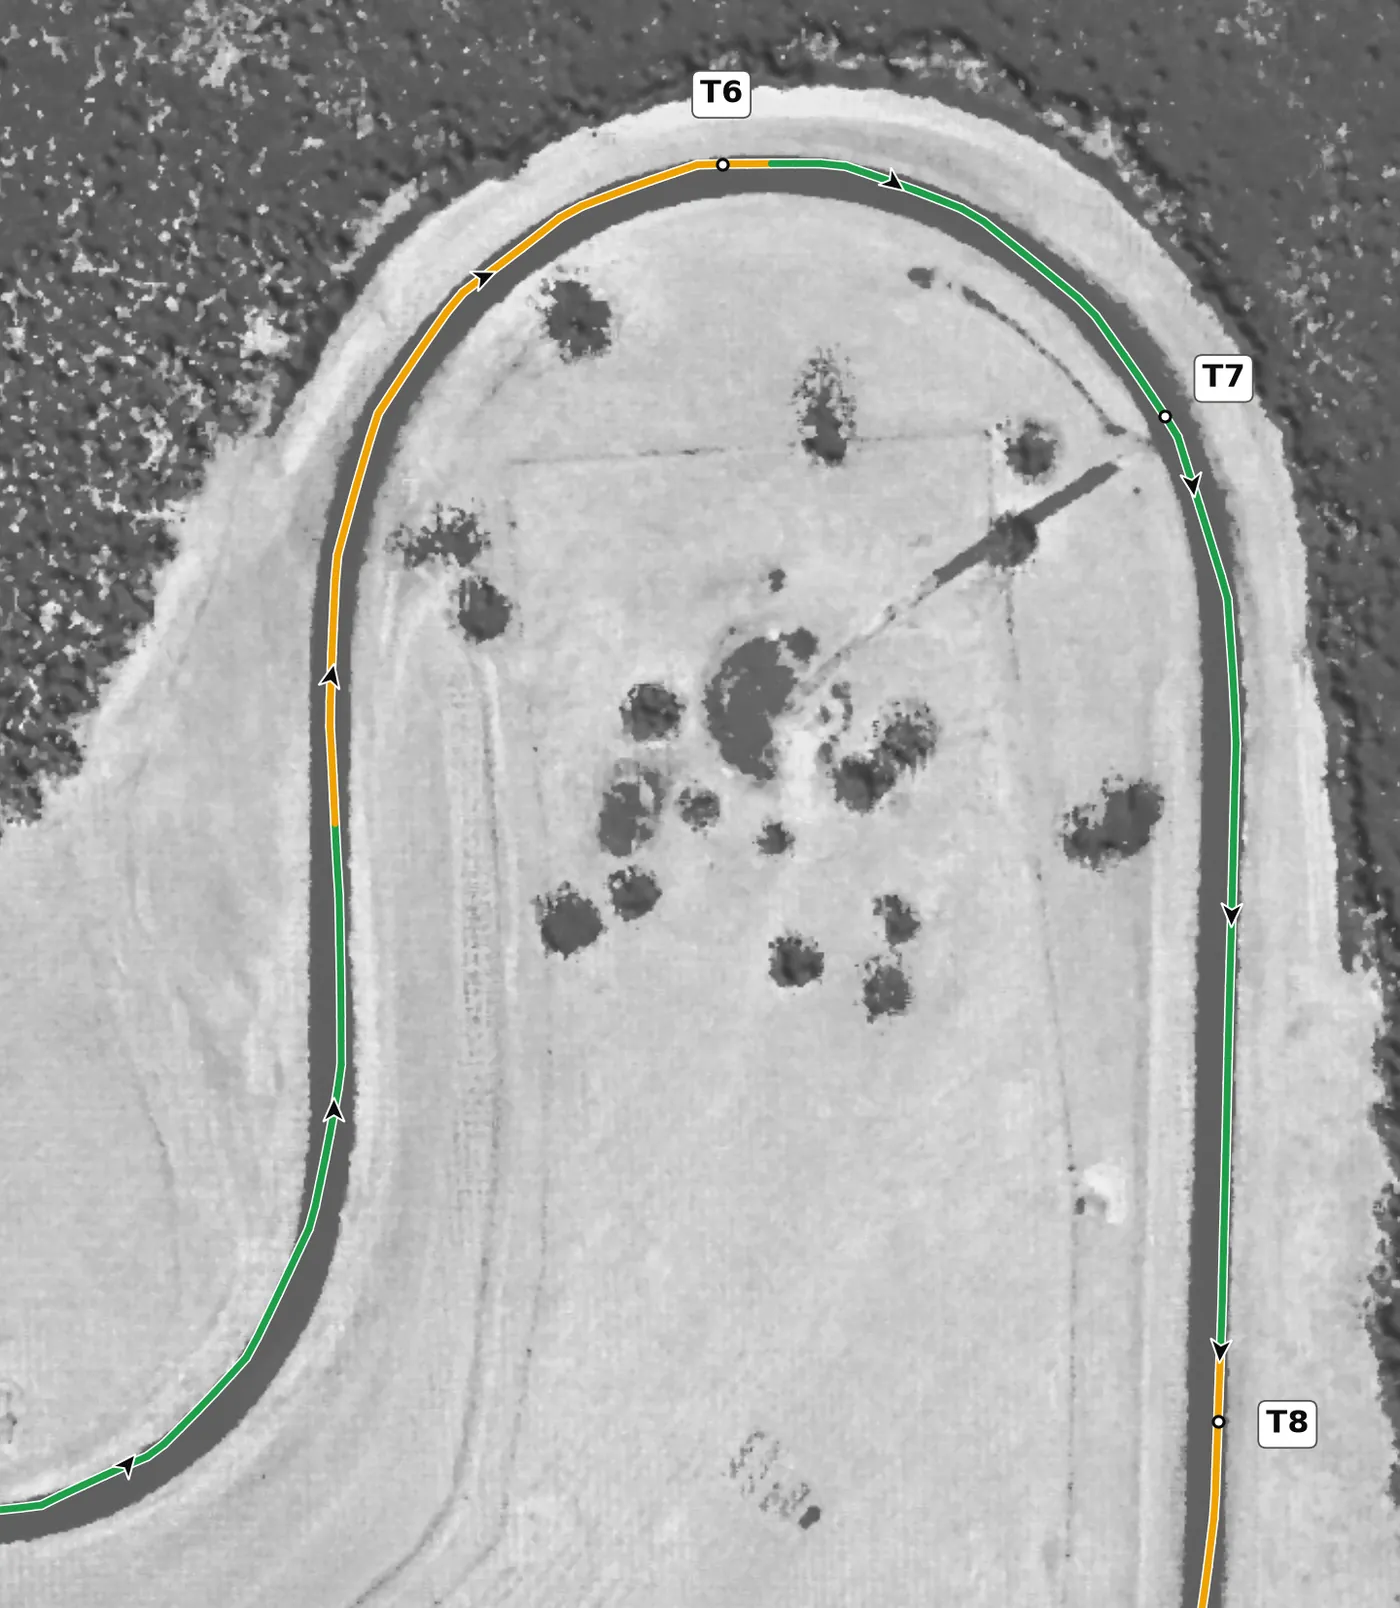
T6 is a right-hand sweeper with a gentle downhill entry, where the car is at its least supported on the lap. Start from the left and turn in at about mid-track, late enough that you can get on the throttle and stay on it through T7; in a 400 hp car, plan on a real brake or a firm lift first. The mistake to avoid is an early turn-in, which washes you out between T6 and T7.
From the survey: The only real slope on the lap: downhill at about −2.5% on entry, with zero camber.
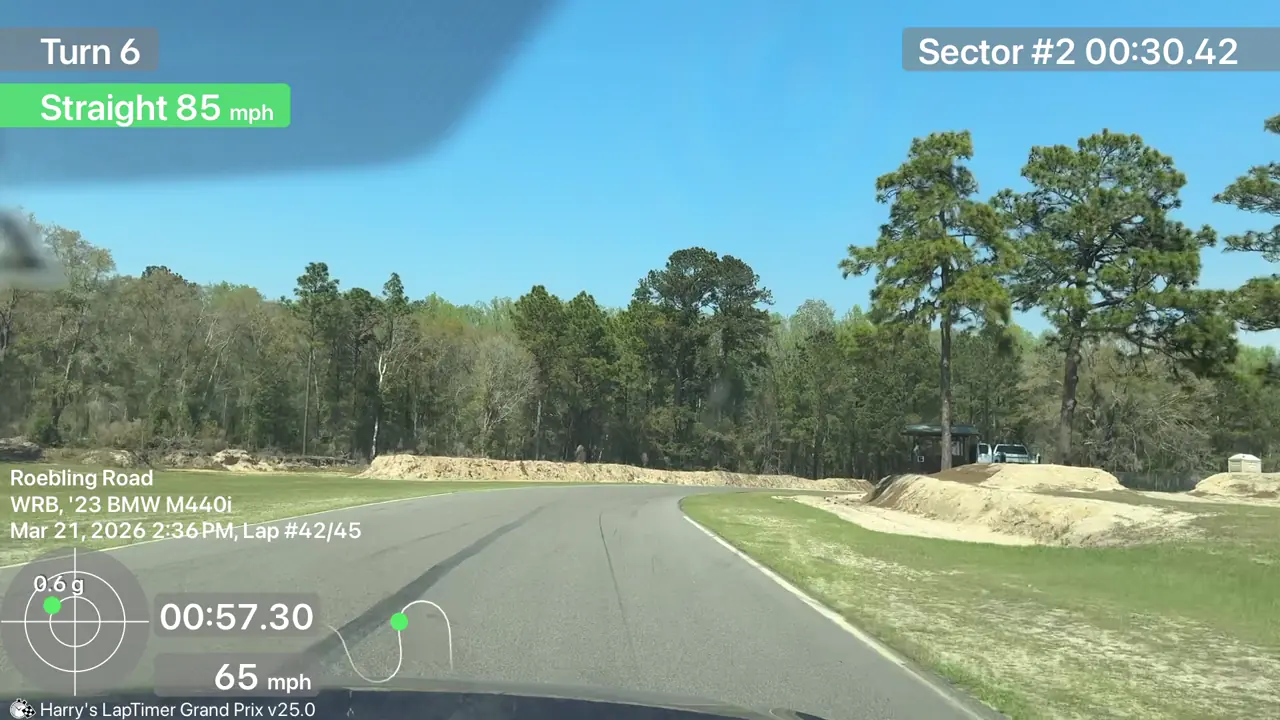
T6 turn-in, 65 mph. Bill's '23 M440i on his 1:26.80 best, March 2026.
- Brake or lift as the long right-side kerb from T5 ends. There are no brake boards at T6.
- Turn in from mid-track, not the left edge. The entry runs downhill.
- The M440i drops to 61 mph here; the Mach 1 holds a steady 66 mph through the whole loop.
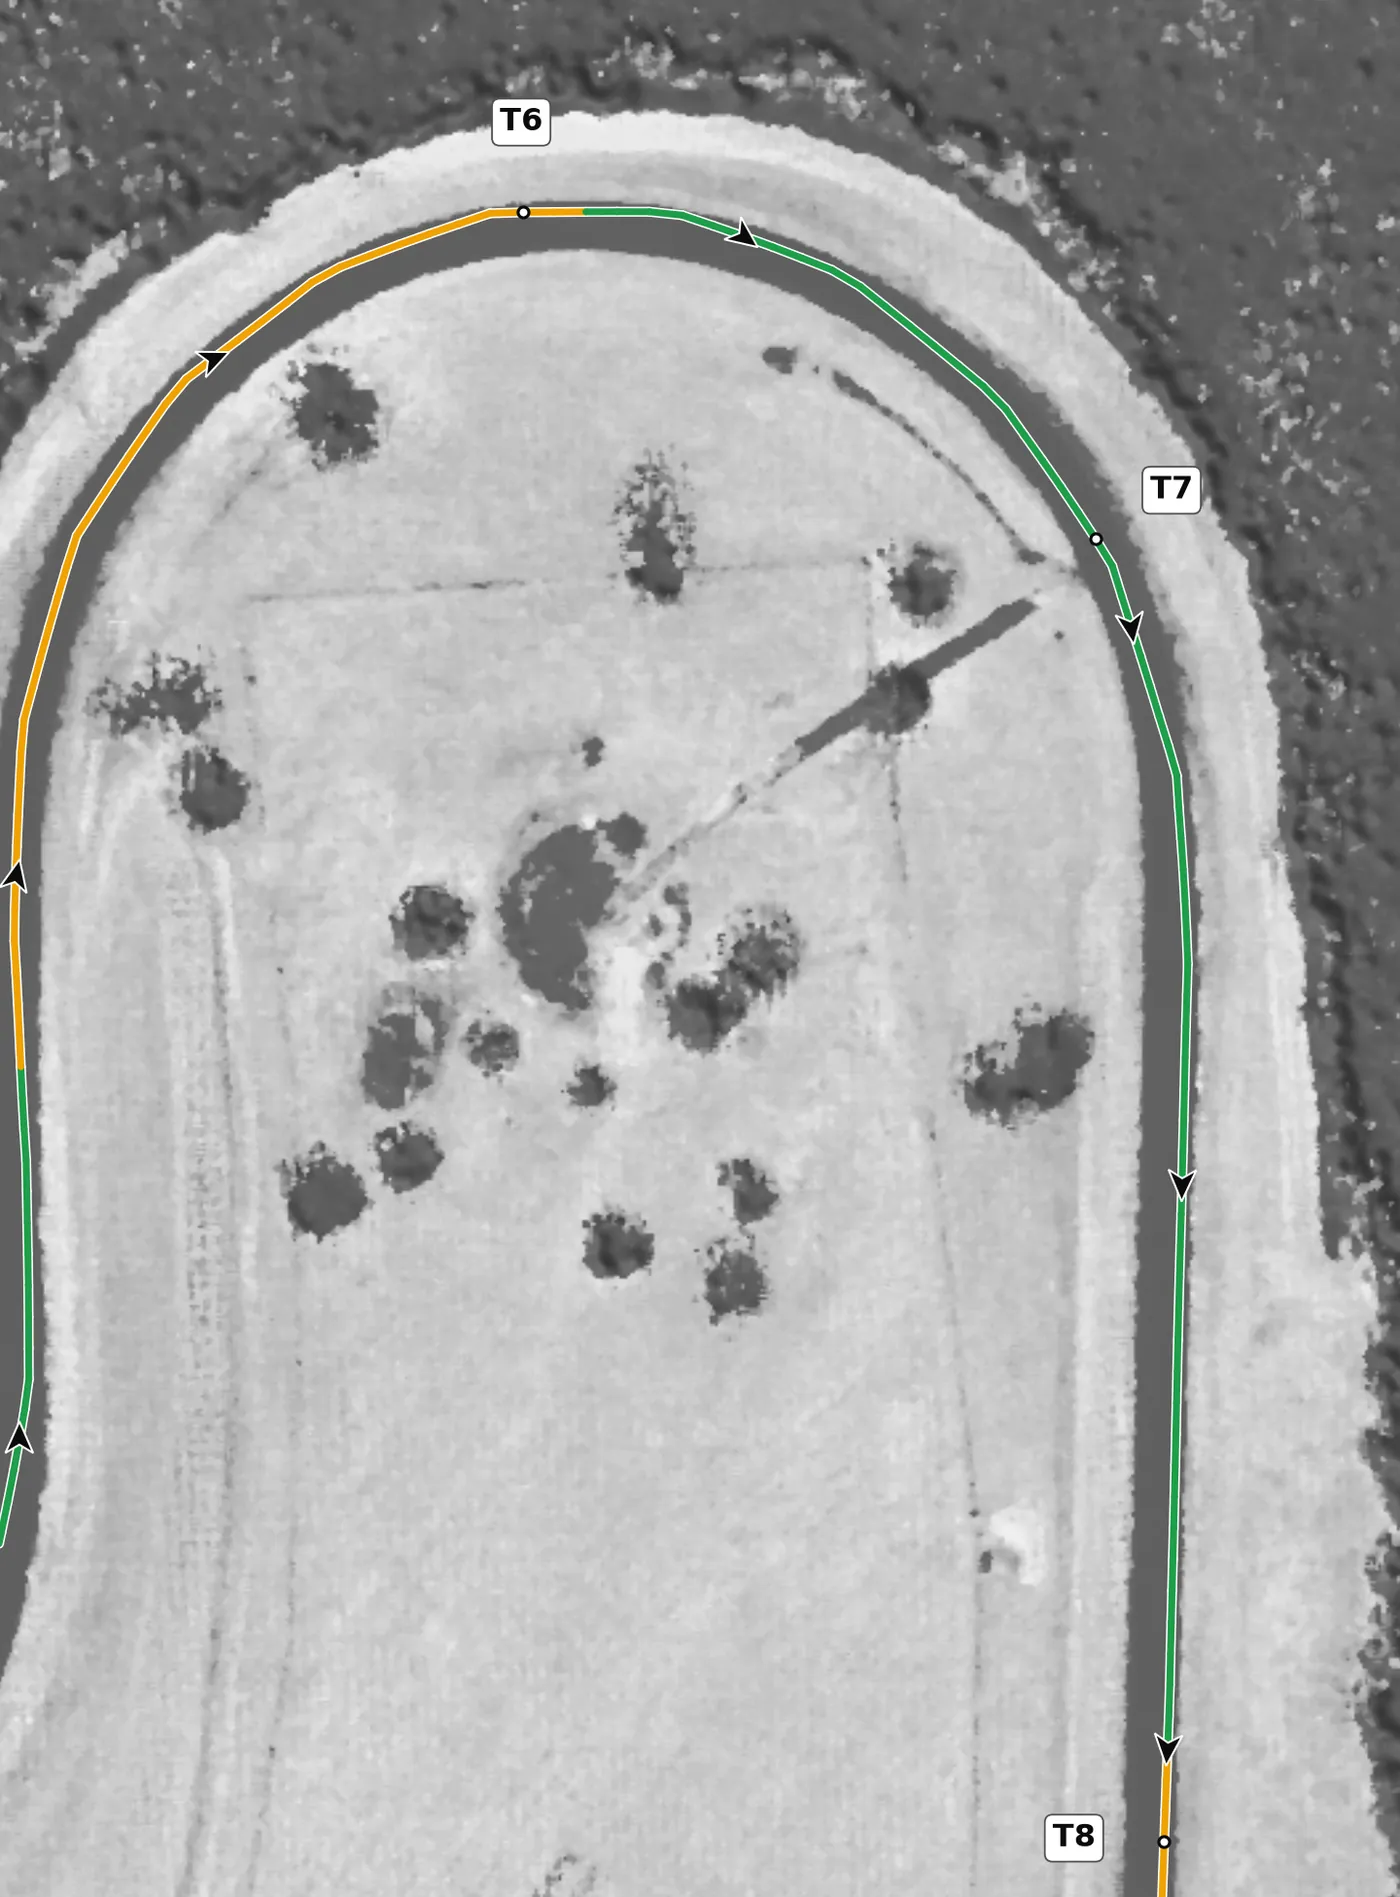
T7 is the uphill second half of the T6–T7 pair, starting from the lowest point on the track. Apex at the tyre stack on the inside, then hold the throttle and track out as the road climbs; if you shift manually, upshift at the crest. The mistake to avoid is an early apex that pushes you wide on the exit, right where the pit entry opens on the right.
From the survey: The lowest point on the lap, with the climb straight after.
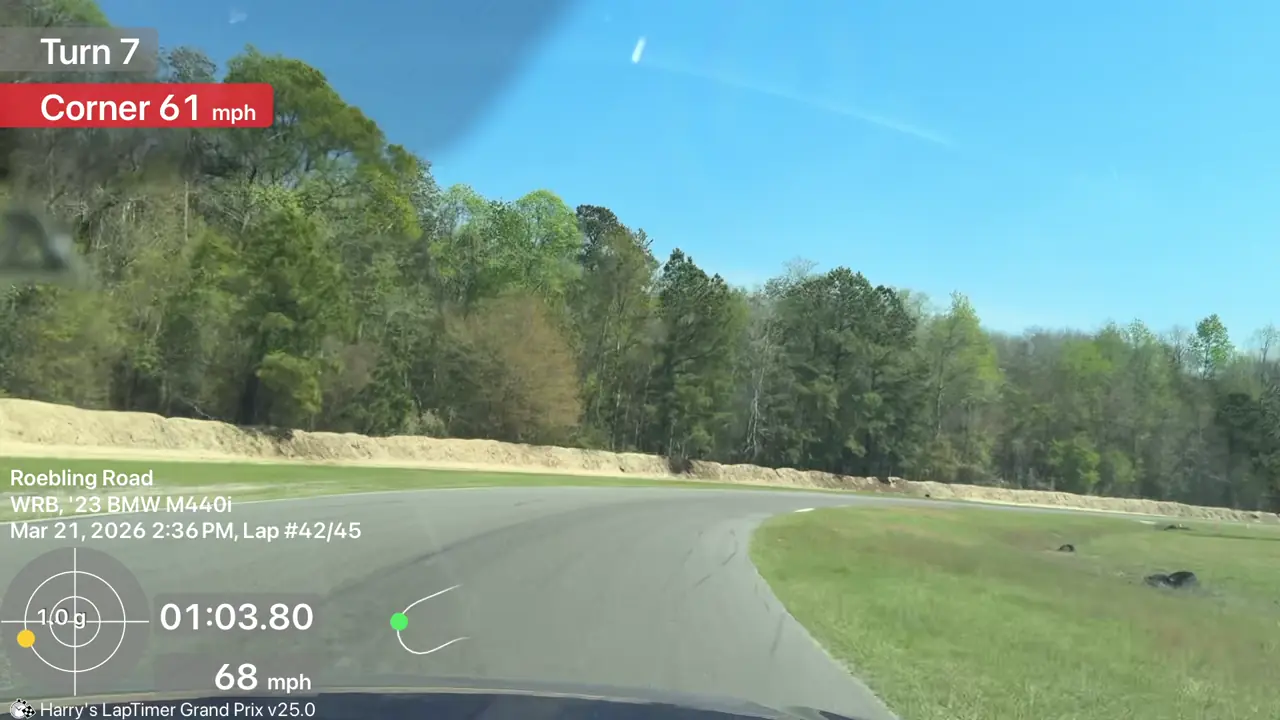
Approaching the T7 apex, 68 mph. Bill's '23 M440i on his 1:26.80 best, March 2026.
- Apex: the tyre stack on the inside (right).
- Throttle on as the road starts to climb.
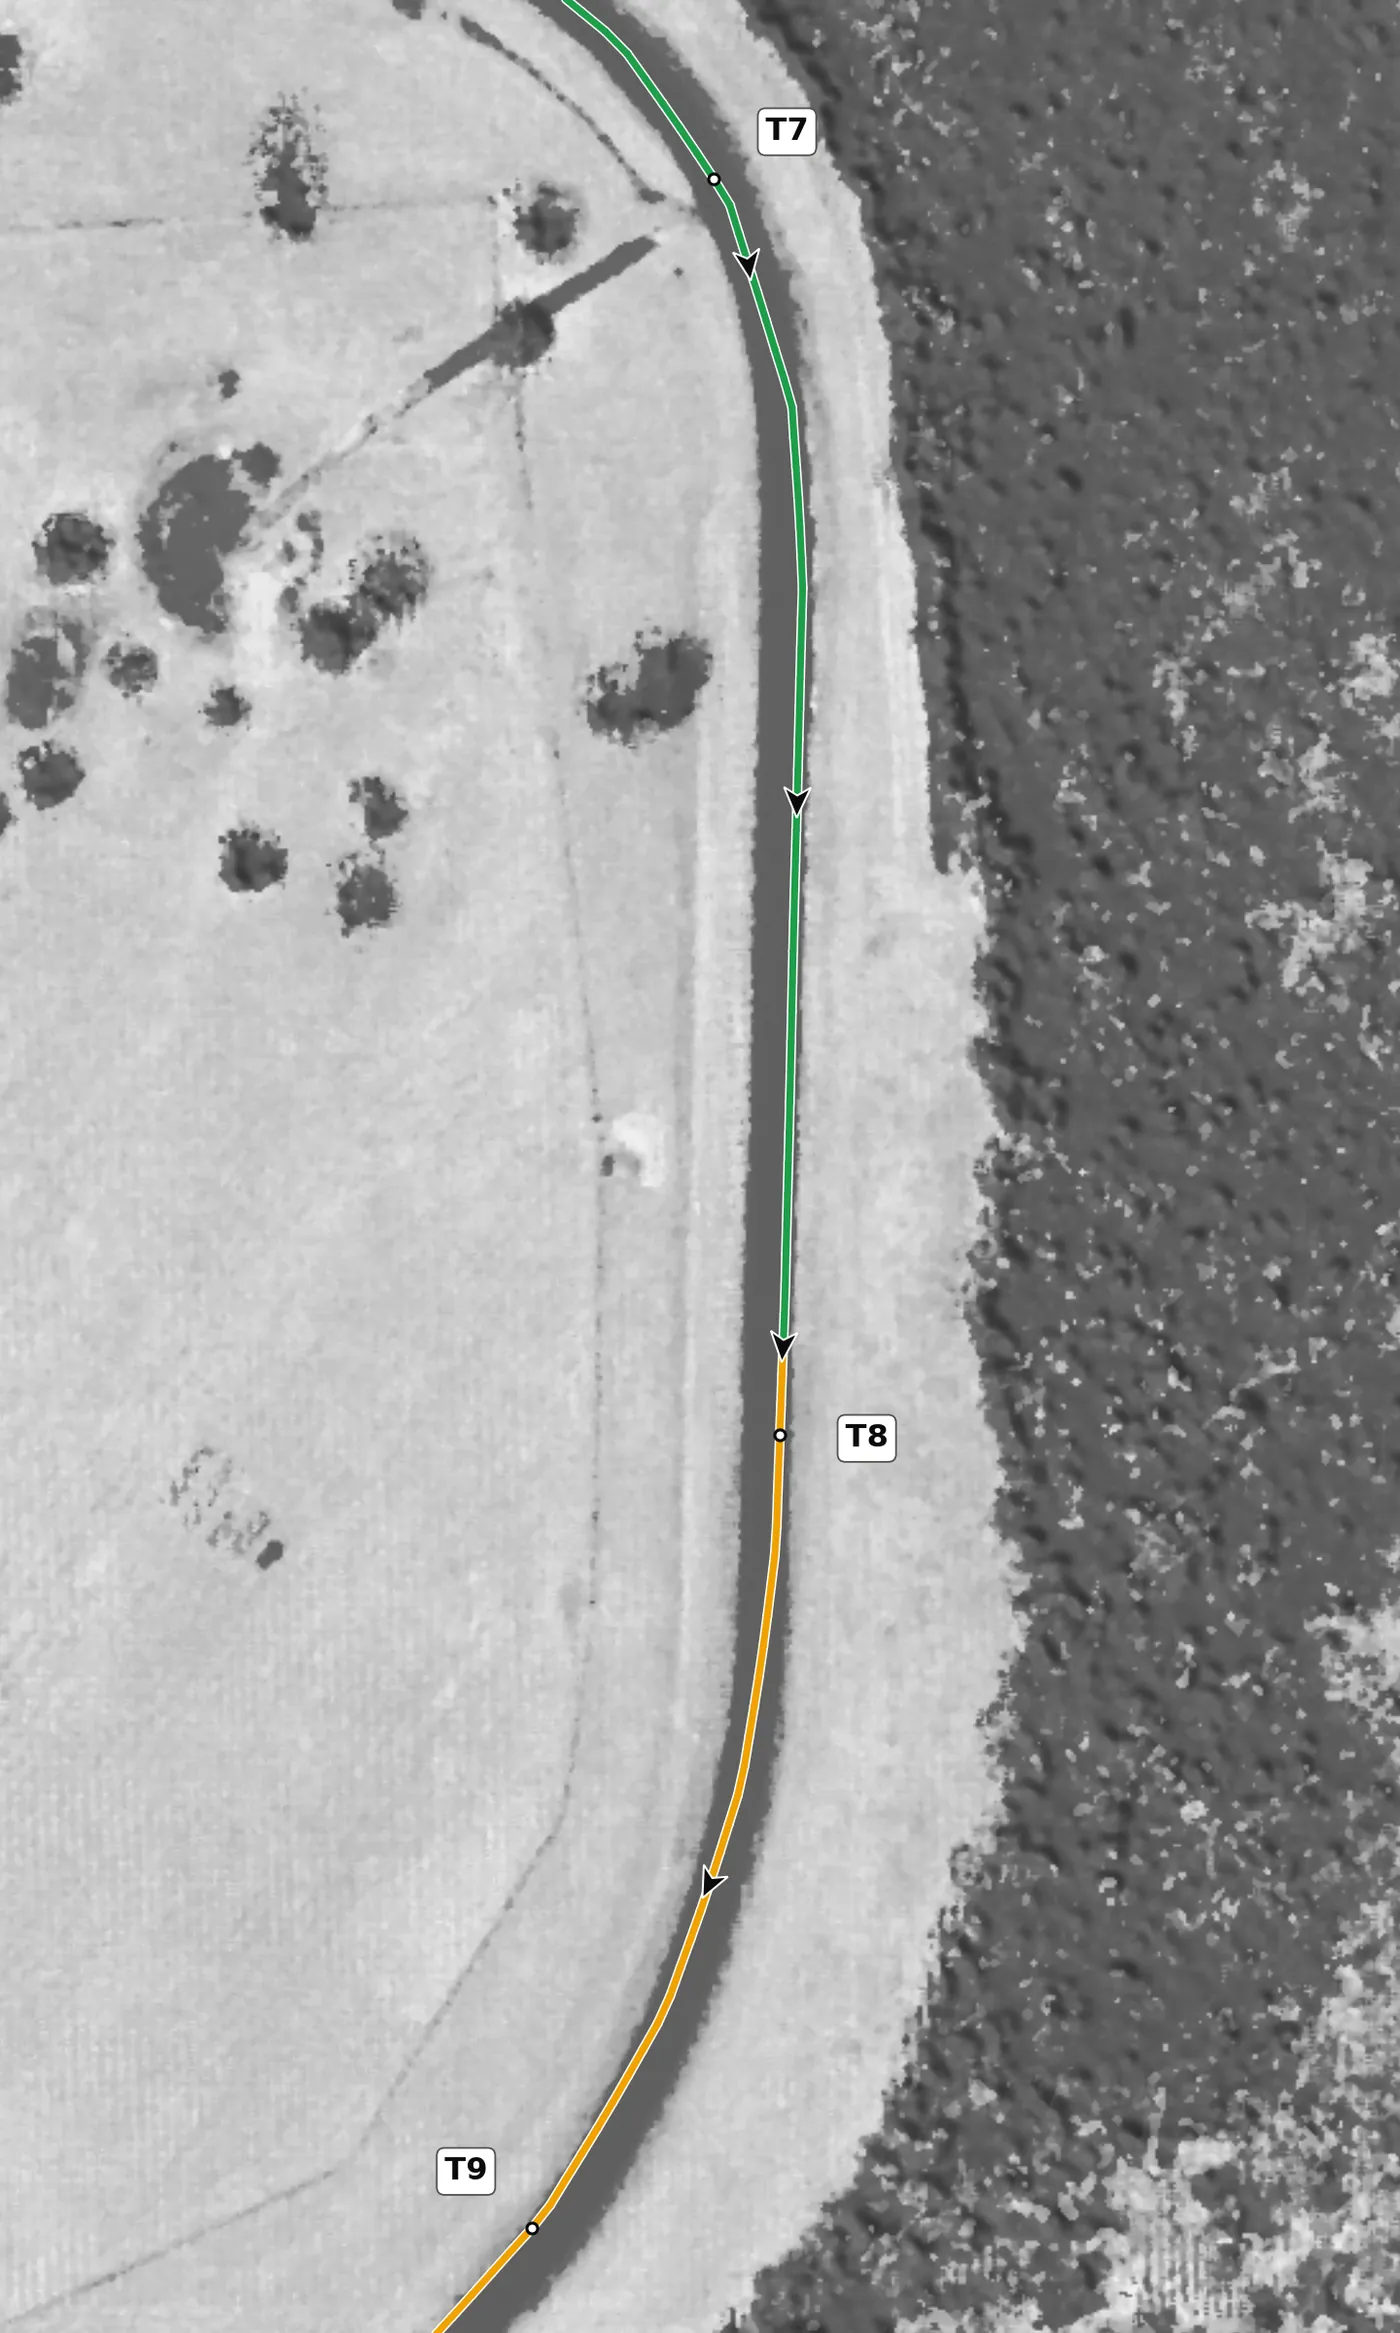
T8 is a slight right at the top of the climb from T7, and it is flat: neither of our reference cars lifts here. Keep the car to the left so that T8 and T9 become one long arc from left to right onto the front straight. The mistake to avoid is running wide at T8, which spoils your line into T9.
From the survey: Reached by the lap's steepest climb (+2.25%), which is why it feels planted. Flat in both of our reference cars.
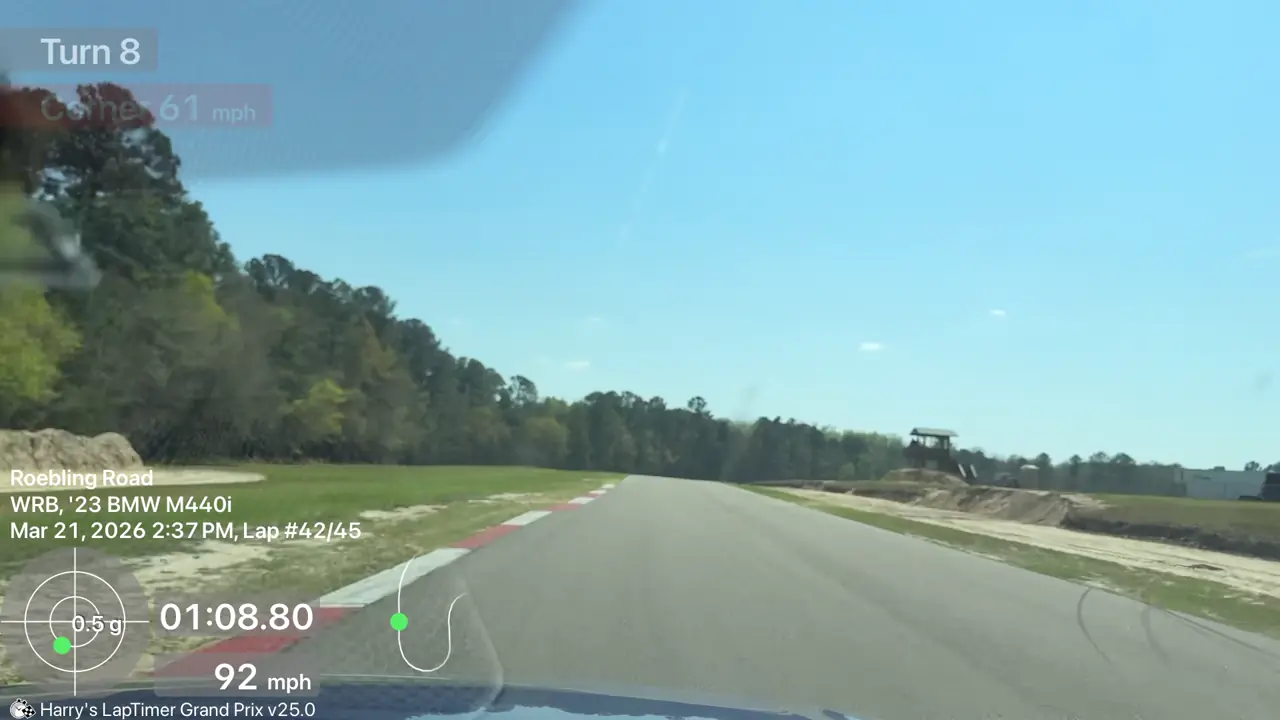
T8, 92 mph and flat. Bill's '23 M440i on his 1:26.80 best, March 2026.
- Stay left, by the red-and-white kerb, for one long arc into T9.
- No lift: 94 to 95 mph in the M440i, and the Mach 1 is still accelerating.
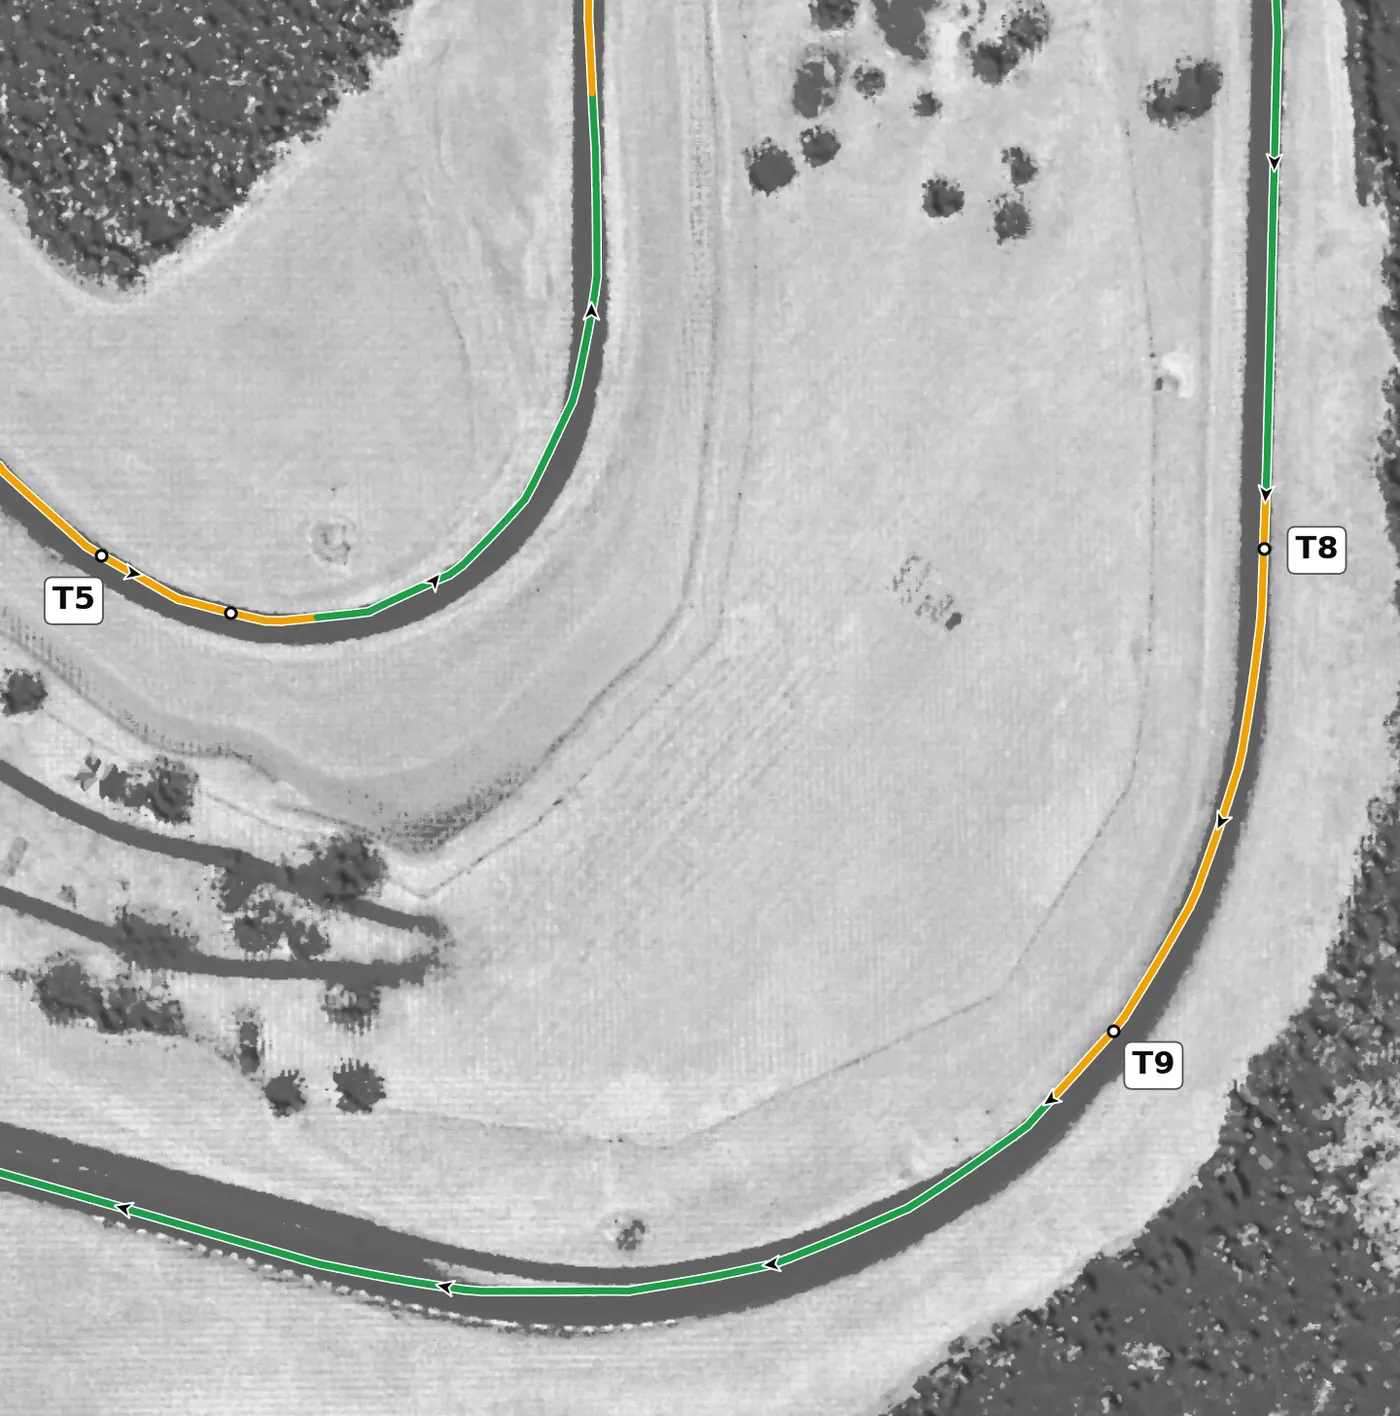
T9 is the last right before the front straight, with a slight dip at the apex that helps the car grip and the only wall on the track at the exit. Turn in as the pit-entry kerbing comes into view and apex at the end of it, just past where the pit lane splits off, then unwind the wheel before going to full throttle. The mistake to avoid is full power with steering lock still on; and if you do go off to the left into the sand, keep the car straight rather than snapping it back toward the pit wall.
From the survey: A small dip right at the apex. The exit sets your speed all the way to T1.
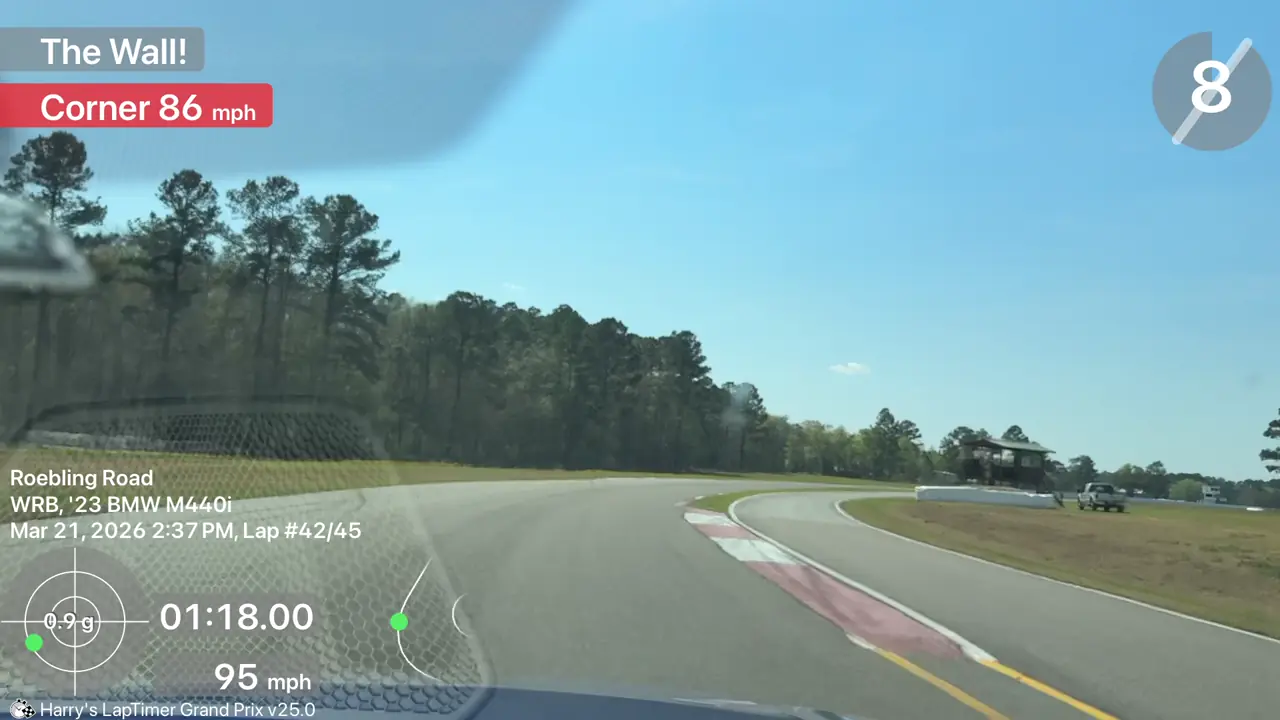
T9 exit past the pit-lane split, 95 mph. Bill's '23 M440i on his 1:26.80 best, March 2026.
- Turn in as the pit-entry kerbing comes into view.
- Apex: the end of that kerbing, just past the pit-lane split.
- Unwind before full throttle: the pit wall on the right is the only wall on the track.
Reference speeds
Read off two in-car videos (Harry's LapTimer overlay): Bill's '23 BMW M440i xDrive on his 1:26.80 best, March 21 2026, and a '22 Ford Mustang Mach 1 at about 1:21.0 with a second family driver, November 2 2025. The M440i lap is the same lap as our 1 Hz data, so its numbers are cross-checked.
| Corner | '23 M440i · 1:26.80 | '22 Mach 1 · ≈1:21.0 | Note |
|---|---|---|---|
| Front straight (top speed) | 131 | 144 | The M440i is on its 130 mph limiter. The front straight is the only place on the lap it reaches it. |
| T1 brake marker | before the 5 board | 4 board | |
| T1 apex | 69–70 | ≈80 | The biggest single difference on the lap. |
| T1–T2 slowest point | 65 | 66 | |
| T3 apex | 87 | ≈95 | A small lift on entry in both cars. |
| T4 slowest point | 62 | 66 | |
| T5 slowest point (5b) | 62–63 | 65–66 | |
| T6 slowest point | 61 | 66 | The Mach 1 holds 66 through the whole loop. |
| T7 at the tyres | 70–72 | ≈68 | |
| T8 | 94–95 | ≈99–102 | Flat in both cars. |
| T9 slowest point | 86 | ≈94 |
All speeds in mph. Speeds are GPS readings, ±1–2 mph; the ≈ values are matched to the same spot by scenery. Use them to see where a faster car gains, not as targets for your car.
About the track
Elevation (LiDAR)
Roebling is the flattest track we have surveyed: about 5 m of relief over the whole lap in Georgia's statewide LiDAR (flown in 2019), with no crest, no compression, and no corner banked or off camber. The steepest cross-slope anywhere is 2.15%, at T2. All the vertical interest is from T6 to T9: T6 drops at about 2.5% on entry, T7 is the lowest point on the lap, and the steepest climb (+2.25%) leads up to T8. The levers here are tyres, line and patience, not the road.
The 2022 repave
The track was repaved in spring 2022, finished by about late May, with the layout and length unchanged (one source dates it to 2023, but four from mid-2022 say 2022). The surface is faster now, and our LiDAR and many published guides predate it, so treat older notes about bumps, kerbs and surface detail as unverified. In March 2026 the T1 countdown boards, the T7 tyre stack and the T9 pit-lane split were all still where the older guides put them.
Sim practice
We also lap a community Roebling Road for Assetto Corsa in an M340i mod. Use it to learn the shape, the order of the corners and where to look, not for speeds: the scan predates the 2022 repave, the sim car has no 130 mph limiter, and the mod's physics are generous. It laps almost 9 s quicker than the real M440i and carries far more speed (85 against 69 mph at T1, 78 against 64 at T4, 100 against 89 at T9).
Version history
- v1.3 · 2026-10-23 — Corner guide checked against our corner canon and two in-car videos (Bill's M440i and a Mach 1): an in-car reference frame with brake and turn-in markers for every corner, reference speeds, and notes on the LiDAR survey, the 2022 repave and sim practice. T8 is now described as flat, and T5 is no longer called the single slowest corner (T4, T5 and T6 are all about the same speed). The line maps are unchanged.
- v1.2 · 2026-10-01 — T3 is now drawn on throttle from the apex: the car gains speed through the sweeper, so it is not a lift.
- v1.1 · 2026-10-01 — Speeds and braking points rebuilt from cars at a typical quick HPDE pace. Top speed on the front straight drops from about 215 to 199 km/h, T1 braking starts about 20 m earlier, at the 5 board, T4 about 15 m later, and T5 and T6 are now a lift or a light brake rather than a hard stop. The line now goes straight from throttle to brake, with no coasting in between.
- v1.0 · 2026-10-01 — First version.
Feedback contributors
Drivers and instructors whose feedback has improved this line. Thank you.
- Mike M — no coasting between throttle and brake; braking points (v1.1)
- Brian L — corners where the car gains speed are throttle, not a lift (v1.2)